Hero Wars adventure 4 Fall of the Celestial City map and routes
Hero Wars adventure 4, Fall of the Celestial City: the full map redrawn, team level 55, the classic 3-player routes and other ways through for 1, 2 or 3 players.

Adventure 4, Fall of the Celestial City, opens at team level 55. You need to be in a guild, up to three guild members can play it together and every run costs one Portal Charge. The boss at the end is Corrupted Cleaver.
Most guides show one fixed route per player. In this blog I redrew the whole map with every point and path, then worked out other ways through it, so you can still finish when a teammate is offline, when you play with two people, or when a tower on the usual route is too strong for your team.
The map
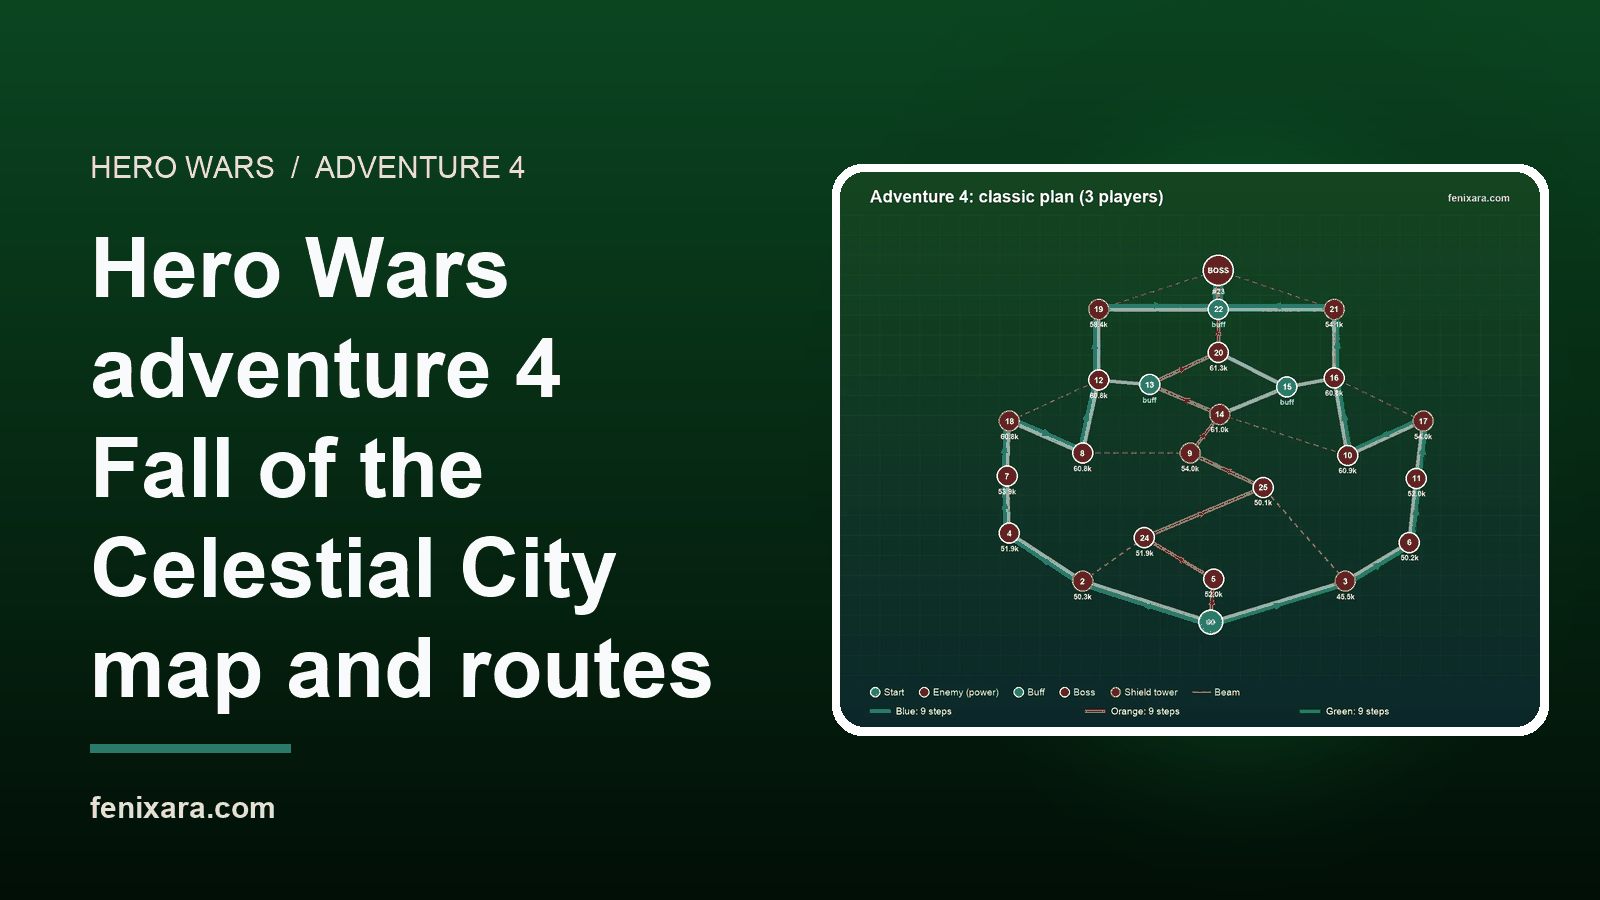
Here is the full map, redrawn. Point numbers match the game, so #1 is where everyone starts and #23 is the boss. The small number under an enemy is its power.
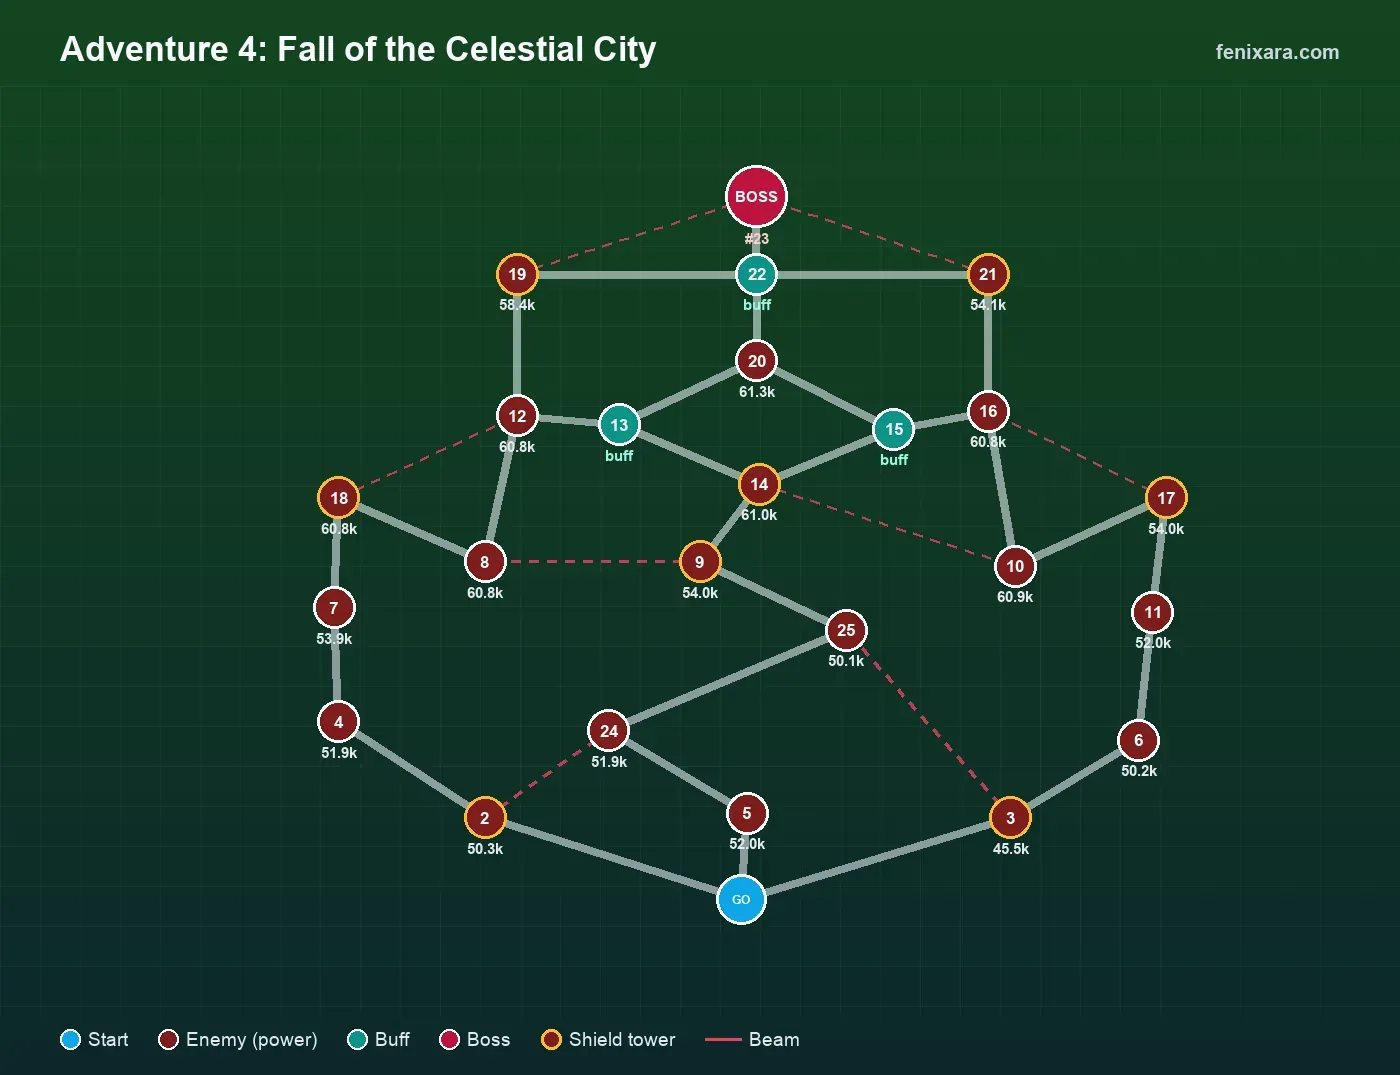
25 points
The start is #1 and the boss sits on #23. Every circle is a point you can step on, the light lines are the paths between them.
Enemy power
The number under each enemy is its power as shown in game. Your team should be close to it, or have a buff, before you attack.
Shield towers
The towers with a gold ring send red beams on the map. A beam protects the point it lands on, so beat the tower at the start of a beam before you attack the point at its end.
- #9 shields #8
- #14 shields #10
- #18 shields #12
- #17 shields #16
- #19 and #21 shield the boss
- #2 shields #24
- #3 shields #25
Classic routes and other ways
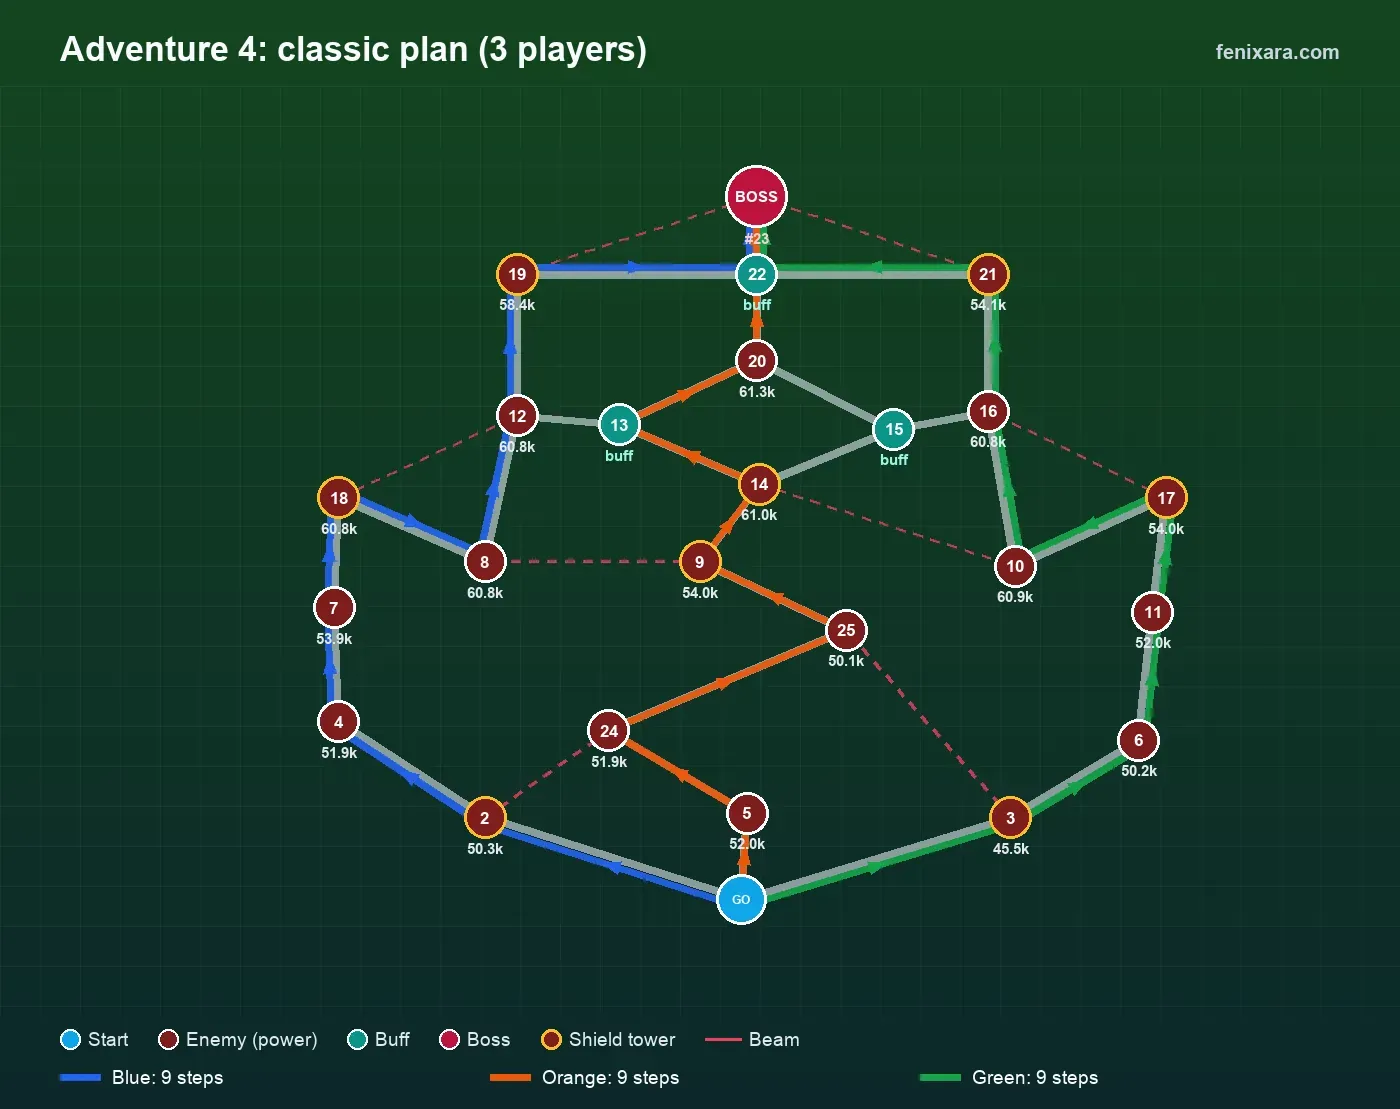
The usual plan sends each player down one coloured route. Below each route you'll find other ways that reach the same end point, with the number of fights and the total enemy power, so you can pick the one that fits your team.
A beam protects the point it lands on. When a route walks onto a protected point without beating its tower itself, the route says which tower a teammate has to beat first. Shorter ways reach the same point faster but beat fewer enemies on the way.
I kept every other way and every plan at 9 steps or less, the length of the longest classic route on this map, so none of them asks a player to walk further than the usual plan does.
Blue route to the boss
This is the blue line of the usual 3-player plan. I also list 2 other ways to reach the boss, so you aren't stuck if a teammate already took a tower or you want weaker fights.
- Steps: #2 → #4 → #7 → #18 → #8 → #12 → #19 → #22 → Boss
- What it takes: 9 steps, 7 fights, enemy power 397k, buff at #22, ends on the boss, needs #9, #21 beaten first (by a teammate or an earlier run)
- The classic plan has the boss hit 2 times in total, so plan who finishes there.
- Other way 1: #5 → #24 → #25 → #9 → #14 → #13 → #20 → #22 → Boss (9 steps, 6 fights, enemy power 330k, buff at #13, #22, ends on the boss, needs #2, #3, #19, #21 beaten first (by a teammate or an earlier run))
- Other way 2: #3 → #6 → #11 → #17 → #10 → #16 → #21 → #22 → Boss (9 steps, 7 fights, enemy power 378k, buff at #22, ends on the boss, needs #14, #19 beaten first (by a teammate or an earlier run))
Orange route to the boss
This is the orange line of the usual 3-player plan. I also list 2 other ways to reach the boss, so you aren't stuck if a teammate already took a tower or you want weaker fights.
- Steps: #5 → #24 → #25 → #9 → #14 → #13 → #20 → #22 → Boss
- What it takes: 9 steps, 6 fights, enemy power 330k, buff at #13, #22, ends on the boss, needs #2, #3, #19, #21 beaten first (by a teammate or an earlier run)
- The classic plan has the boss hit 2 times in total, so plan who finishes there.
- Other way 1: #3 → #6 → #11 → #17 → #10 → #16 → #21 → #22 → Boss (9 steps, 7 fights, enemy power 378k, buff at #22, ends on the boss, needs #14, #19 beaten first (by a teammate or an earlier run))
- Other way 2: #2 → #4 → #7 → #18 → #8 → #12 → #19 → #22 → Boss (9 steps, 7 fights, enemy power 397k, buff at #22, ends on the boss, needs #9, #21 beaten first (by a teammate or an earlier run))
Green route to the boss
This is the green line of the usual 3-player plan. I also list 2 other ways to reach the boss, so you aren't stuck if a teammate already took a tower or you want weaker fights.
- Steps: #3 → #6 → #11 → #17 → #10 → #16 → #21 → #22 → Boss
- What it takes: 9 steps, 7 fights, enemy power 378k, buff at #22, ends on the boss, needs #14, #19 beaten first (by a teammate or an earlier run)
- The classic plan has the boss hit 2 times in total, so plan who finishes there.
- Other way 1: #5 → #24 → #25 → #9 → #14 → #13 → #20 → #22 → Boss (9 steps, 6 fights, enemy power 330k, buff at #13, #22, ends on the boss, needs #2, #3, #19, #21 beaten first (by a teammate or an earlier run))
- Other way 2: #2 → #4 → #7 → #18 → #8 → #12 → #19 → #22 → Boss (9 steps, 7 fights, enemy power 397k, buff at #22, ends on the boss, needs #9, #21 beaten first (by a teammate or an earlier run))
Plans for 1, 2 or 3 players
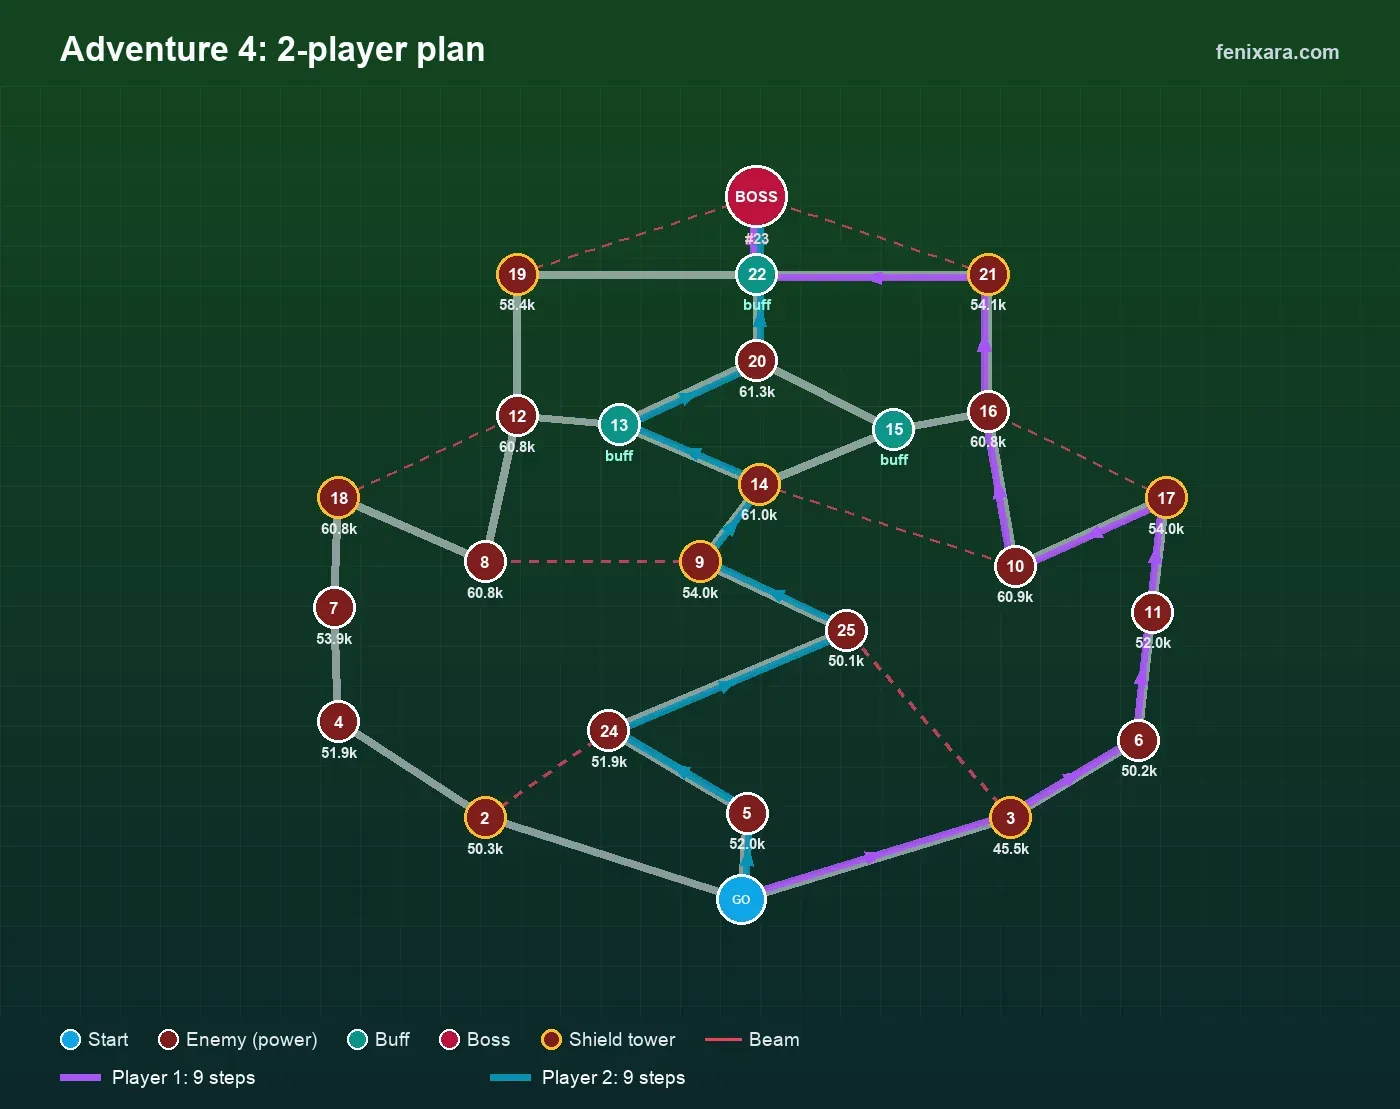
Not every guild has three people free at the same time. These plans are worked out from the map: the fewest steps, spread out so players don't fight the same towers, and taking the shield towers each route needs where the team size allows it.
2-player plan
Two players can still finish the map. Both routes below end on the boss or on the classic end points, and together they take the shield towers they need.
- Player 1: #3 → #6 → #11 → #17 → #10 → #16 → #21 → #22 → Boss (9 steps, 7 fights, enemy power 378k, buff at #22, ends on the boss, needs #14, #19 beaten first (by a teammate or an earlier run))
- Player 2: #5 → #24 → #25 → #9 → #14 → #13 → #20 → #22 → Boss (9 steps, 6 fights, enemy power 330k, buff at #13, #22, ends on the boss, needs #2, #3, #19, #21 beaten first (by a teammate or an earlier run))
- Leaves 2 shield towers it needs untouched, so a teammate or a second run has to clear them first.
Solo plan
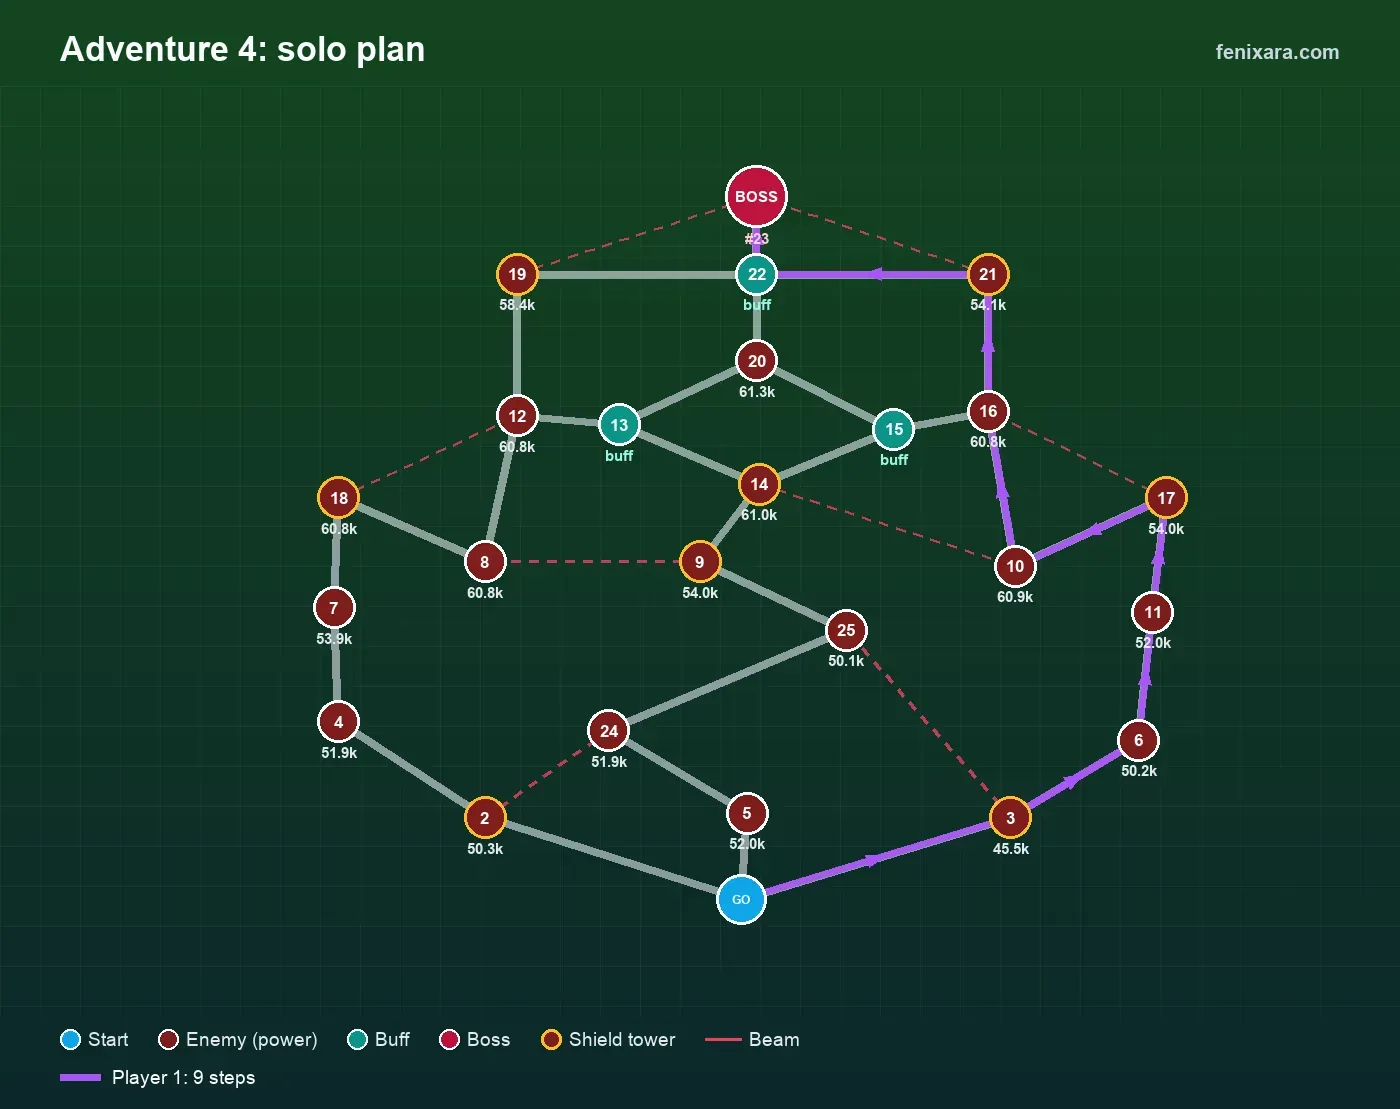
Playing alone, this is the shortest way from the start to the boss. Expect the boss to be tough without the buffs a full team collects.
- Player 1: #3 → #6 → #11 → #17 → #10 → #16 → #21 → #22 → Boss (9 steps, 7 fights, enemy power 378k, buff at #22, ends on the boss, needs #14, #19 beaten first (by a teammate or an earlier run))
- Leaves 2 shield towers it needs untouched, so a teammate or a second run has to clear them first.
Before you start
- Agree in guild chat who takes which route
- Check you have a Portal Charge
- Compare your power with the numbers on the map
- Beat the shield towers before the points they protect
- Collect the chests before leaving; unclaimed ones go to mail
After you clear all four chests once, the game lets you raid adventure 4 in one click next time. Adventure 5 needs adventure 4 cleared first.
More to read
Hero Wars is a trademark of Nexters. This site is not affiliated with or endorsed by the game's developer. The maps here are redrawn for this site from the in-game adventure maps; the classic routes are checked against solfors.com and the requirements against h-w.fun. The other routes and team plans are worked out from the map.